| There is a problem right now with this block. |
|
1-2. Garden Tractor Tire Restoration
|
Garden Tractor Tire Restoration
When those wheels have to look good!
rn rn rn rn Tractor Tire Restoration Technique
rn | rn rn rn | | rn | rn 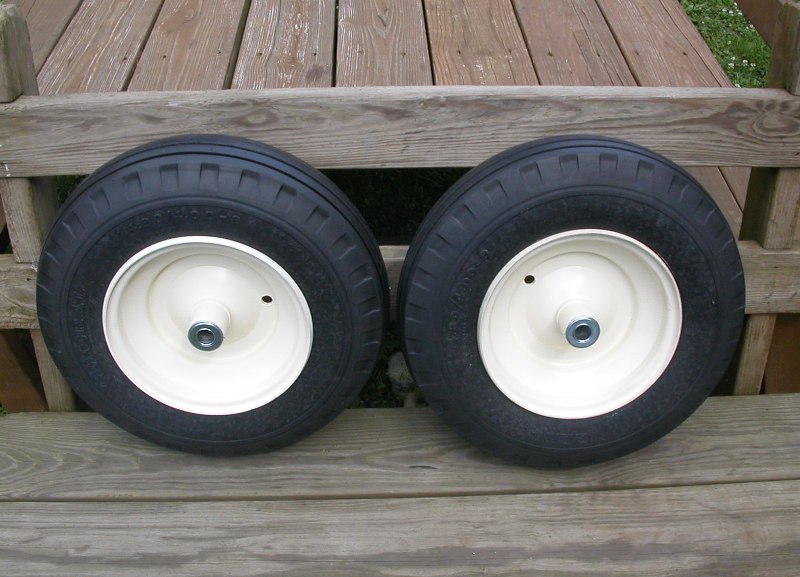 | rn | rn | rn rn rn | Shown here are two original 1958 Wheel Horse front tires | rn rn rn | | rn rn rn | TOOLS REQUIRED: | rn rn rn rn rn - Brass Wire and Plastic Bristle Brushes (Do NOT use Steel)
rn - Popsicle Sticks
rn - Automotive Brake Fluid
rn - Dawn Dish Detergent
rn - Oxi-Clean
rn - M. E. Miller's "Black Tire Paint"
rn - 1" and 3" Foam Brush
rn - 1" Horsehair Paint Brush
rn - 6 oz. Mixing Cup
rn rn | rn rn rn | rn Tractor tires change styles over the years and finding the "correct" tire for your restoration subject can prove impossible. I discovered a product which, if your tire is in relatively good shape, will make them look almost brand new. rn I happened to be helping a friend pickup several of his re-treaded tractor trailer tires, when I noticed one of the technicians spraying a black colorant on some freshly re-treaded tire casings. When I asked about the product he was using he showed me a 55 gal. drum of material. Further investigation revealed that the same product was being offered for sale on eBay by a company known as M. E, Miller's Tire in Wauseon, OH. ME Miller's repackages the material in 1 Quart and 1 Gallon containers and sells it for about $20.00 to $40.00. The 1 qt. container will restore over 100 tractor size tires, so is therefore very economical. The product can be purchased direct from M. E. Miller's website ( http://www.millertire.com ), or from their eBay Store ( http://stores.ebay.com/M-E-Miller-Tire-Co/_i.html?_nkw=paint&submit=Search&_sid=70596348 ). rn The product is a water based rubber dye and is mixed with water before use. Roughly the consistency of Kindergarten finger paint, the "paint" is a high-solids mixture which can be applied at various viscosity in order to gain the optimal coverage desired. The thicker the mix, the more blemishes and discoloration it will "remove". The recommended mixture is a 50 : 50 ratio, and has always been the correct mix for all of the tires I have restored. Normally one coat covers and recolors the tire, the second coat finishes the appearance. The internal chemical makeup is unknown, but from my experience I can justly say that much of the cracking and checking of a moderately distressed tire is hidden by using this process. I have also noticed that the product replenishes the moisture of the rubber and makes it somewhat more pliable. Though this product will not correct a decomposing tire, it will certainly add life to an otherwise sound tire. rn | rn rn rn | | rn | rn | rn | rn | rn rn rn | THE PROCESS: | rn rn rn | 1. | rn Cleaning: | rn | rn rn rn | | rn rn 
rn Like any other restoration process, cleaning is essential. You must remove all of the old oils and contamination from the tire before moving on to the repair process. rn Start by removing the tire from the rim. Then scrub the tire casing inside and out using the brass and plastic bristle brushes, Popsicle sticks, and Dawn Dish Detergent. Start by wetting the tire with water and scrubbing with a 50/50 solution of Dawn Dish Detergent and water. Be careful not to scrub so hard as to remove any of the rubber, but hard enough the remove dirt, oil, and foreign materials form the inside and outside of the casing. rn | rn rn rn | | rn | rn | rn | rn | rn rn rn | 2. | rn Repairs: | rn | rn | rn | rn rn rn | | rn rn Once the tire is completely clean, rinsed, and dried: inspect the inside and outside very carefully in order to Identify any damage and through-holes. If the tire is damaged or has obvious holes through the casing, these must be repaired before moving forward. rn Conventional bicycle tire repair patches can be applied to the inside of the tire casing to repair any obvious through-holes, but must be installed correctly in order to insure a long-lasting repair. Scuff the inside of the casing surrounding the damaged are at least 1/4" larger than the patch you will use. 220 grit sand paper works well for this, but any excess material must be removed before applying the vulcanizing rubber cement. Apply a thin layer of vulcanizing cement to both the patch and the scuffed area inside of the casing and allow both the dry approximately 5 minutes. Firmly apply the patch to the scuffed area and allow to dry for an additional 1/2 hour. Several areas can be repaired at one time if each area is addressed in like manner and all are re-cleaned before proceeding. rn External tread repairs are a little more difficult but can be successfully performed if approached patiently. A chunk of missing tread can be cut away and the remaining area squared off. Using the tread from an old tire, a similar sized square of rubber can be produced and inserted to fill the cleaned area. Sand the mating surfaces with 220 grit sandpaper, clean both parts, apply vulcanizing rubber cement to both and allow to dry 5 minutes, then connect the two parts. Once completely dry, lightly sand the glue line to level and clean again. rn Although this is an extensive process it is effective for repairing that impossible to find tire. Once all repairs are made you may move on to the painting step. rn | rn rn rn | | rn | rn | rn | rn | rn rn rn | 3. | rn Painting (re-coloring): | rn | rn | rn | rn rn rn | | rn rn Once the tire is cleaned and repaired mix the M. E. Miller's Black Tire Paint in a 50:50 solution with warm water. Mix thoroughly and apply the paint using the foam and/or soft horsehair brush. Cover the tire evenly and do not allow the mixture to run. Areas of heavy staining or discoloration should disappear when the material is applied. If not, additional coats can be applied later. Allow the tire to completely dry before applying a second or any additional coats. Drying time depends on temperature and humidity but is normally accomplished in less than an hour. rn I recommend the tire be recolored before reinstalling on the rims, then one last additional coat carefully applied so as not to paint the rim, should be applied to complete the process. rn | rn rn rn | | rn | rn | rn | rn | rn rn rn | 4. | rn Finishing: | rn | rn | rn | rn rn rn | | rn Once the tire has been recolored, buff the tire using regular paper towels to give it that new rubber sheen. | rn rn rn | | rn | rn | rn | rn | rn rn rn
|
Last Updated: 2011-05-15 16:45:56 (20603 views)
|
|


 Previous