| There is a problem right now with this block. |
|
3-3. c. - Update (July 01 - 15, 2009)
|
c. - Update (July 01 - 15, 2009) rn rn rn rn | rn Update (July 1, 2009): Had to do the most awful thing today. Cut-up an RJ rim to get a chink of metal to fix another otherwise perfect rim. Man, that first cut was painful! rn Anyway, talked to the welder yesterday and he said he could fix the one front rim, if I had a like piece of metal to replace the removed chunk. The rim needing repair, around the valve stem hole, is rotted out. The rest of the rim is in absolutely perfect condition. Finding another in as good condition is going to be extremely difficult if not impossible. Therefore this rim will be repaired at the expense of one of the lesser quality rims. Delivered the "manufactured" piece and the repair rim to the welder for installation and re-drilling. Should be ready Thursday or Friday. Just in time for the weekend. rn Got the first coat of rusty-red primer sanded and smoothed out on the seat pan. Second coat of light color primer has been sprayed and is drying. When the second coat is dry I will do the final sanding and spray the seat with the Sherwin-Williams Antique White paint, the same paint that will be used on the rims. This will be the first glimpse of the "IH Red" paint against the "Linen". rn Update (July 2. 2009): Finish sanded Seat Pan and sprayed first coat of S-W Antique White. Looks pretty good against the red Seat Bolt. Look at how the sunlight reflects off the Seat Bolt and shows the red color around the edges of the seat. rn Finished Fuel Tank cleaning on the inside, and stripped and in primer on the outside. Re-rounded the throat (neck) and reformed threads which had been slightly flattened. Interior was not as bad as previously expected. Mirror and flashlight inspection of the interior revealed very lightly rusted area immediately below the throat, down on the bottom of the tank, and around the inside of the throat but nowhere else. Large amounts of gasoline lacquer were evident in the forward bottom and sides of the tank. Flushed interior of tank with "Evapo-Rust" (www.Evapo-Rust.com)process, then proceeded with the "POR-15 Cycle Tank Repair Kit" (http://www.POR15.com) . Stripped and cleaned tank exterior and primed with light primer. Tank needs to cure for 96 hours before more work on it can continue. rn | rn rn rn 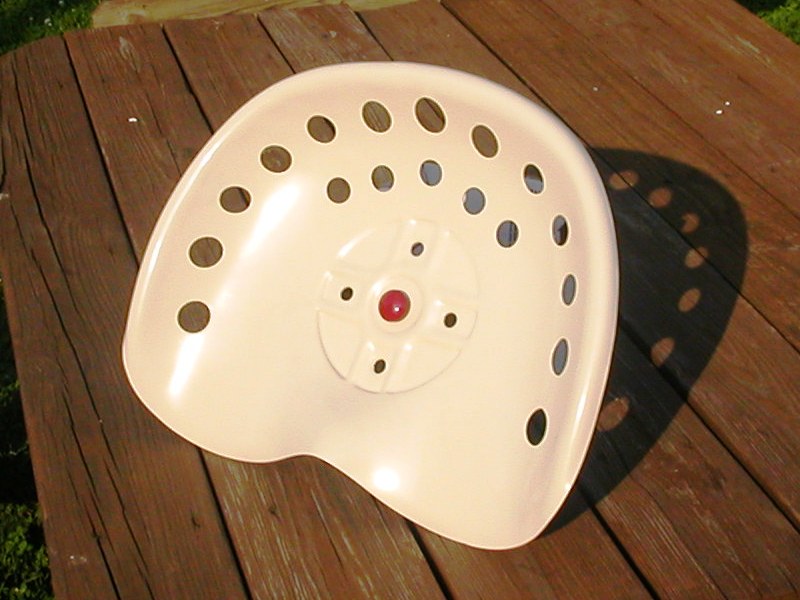 | rn 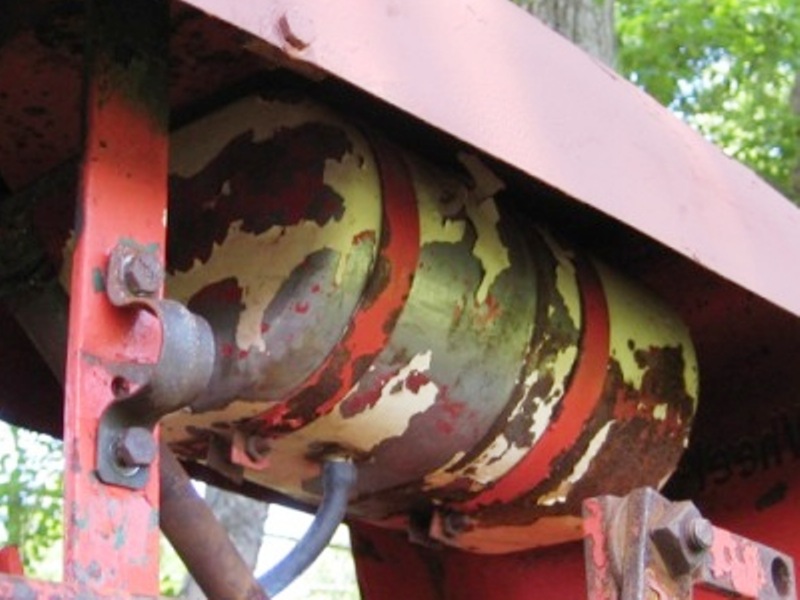 | rn 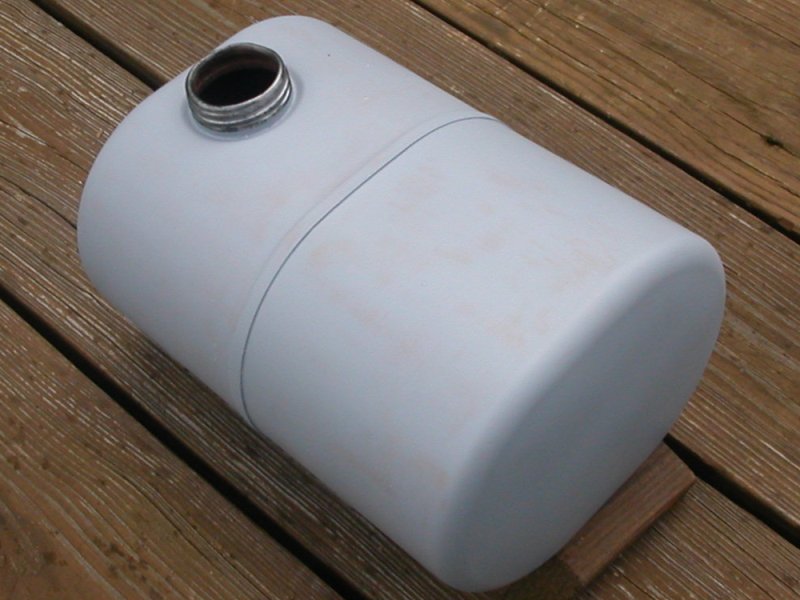 | rn | rn rn rn | First Coat of S-W Antique White | rn Tank Before work | rn Fuel Tank Internals Refinished and completed Exterior Primer | rn | rn rn rn | | rn | rn | rn | rn rn rn | Update (July 3, 2009): Picked up rim from welder today, and dropped off the old "Clevis Pin, Steering" parts for fabrication. They should be ready sometime next week. Hood will be going to the welder next. What a remarkable job he's done with the rim, almost can't tell it's been repaired. That rim will go back to bead blasting for cleanup and return for primer and paint. Painted Reel Mower Attachment Bar and the last Attachment Side Plate. | rn rn rn | | rn | rn | rn | rn rn rn | Update (July 5, 2000): Reel Mower Attachment Bar and Fuel Tank Assembly completed. Got a new cap but need to determine if it was originally bare metal or painted. Fuel tank Assembly complete with NOS (New Old Stock) Kohler Strainer/Sediment Bowl and True Value Hardware 1-3/4" Fuel Tank Cap, which is identical to the one found on the machine, but may or may not be original style cap. | rn rn rn | | rn 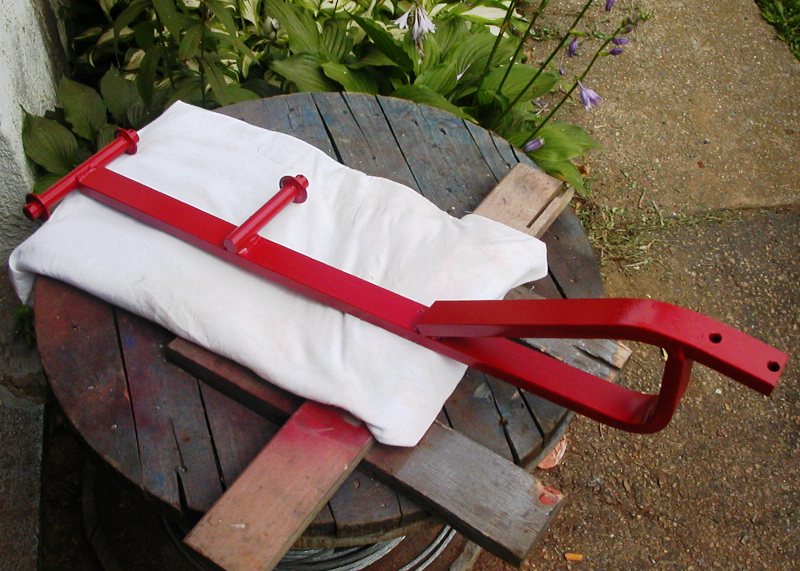 | rn 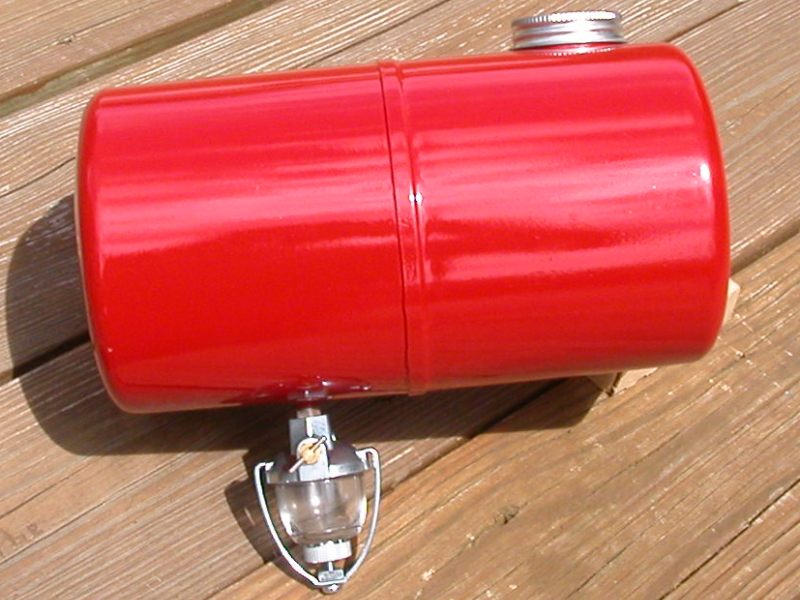 | rn | rn rn rn | | rn Completed Reel Mower Attachment Bar | rn Completed Fuel Tank Assy. | rn | rn rn rn | | rn | rn | rn | rn rn rn | rn Update ( July 6, 2009): Finished restoring the throttle Console and the Front Rims are painted Antique White. The Throttle Console restoration was pretty straight forward, but I think it best to describe the process as many questions were asked pertaining to what I did to it. I completely disassembled the unit and wire wheeled with a small wheel (1") to clean the surface, the parts were then electrolysis cleaned for a few hours. Once out of the bath, all parts showed a significant amount of pitting, as these parts were originally unpainted steel. In order to maintain the appearance and look of unpainted steel, but preserve them long-term, I decided to use aluminum paint which closely approximates the color and appearance of the original. All parts were sanded to remove some of the pitting and get a relatively flat surface. The brass cable ferrule was polished, nut and bolt wire wheeled and polished, plastic washers replaced, and both parts (minus the brass ferrule) were painted with Valspar - Anti-Rust - Aluminum paint. After drying, the parts were reassembled and a TSC throttle console purchased (about $8) to get the new S/S cable and S/S cable sheath parts to complete the unit. The handle (knob) at the end of the throttle arm was another issue. As hard as I tried, I could not get the handle clean enough to look good with the rest of the restored parts in the console. I briefly pondered making another handle, but decided that was too much work. I finally decided to lightly paint the handle the same color as the rims and seat pan (WH-Linen color), which is similar to its original color. rn I've also drawn as set of plans for a reproduction throttle console and have figured out a way to make a reproduction handle as well. I am seriously considering making a reproduction console from a sheet of 3/32" stainless steel, for installation on this machine sometime in the future. The plans are on paper at this time and I still need to transfer them to electronic format. The handle can "easily" be made with casting rubber and acrylic resin, but some experimentation with color matching the acrylic resin to the original handle color will take some work. rn Essentially you make a "plug" (a dimensional duplicate to the original handle) out of balsa wood, and prime and sand the plug smooth. You make up a wooden plate to hold a reproduction throttle handle horizontally, so that the plug (on the end of it) is suspended above the bottom of a Dixie Cup (about half way up the cup). You pour in the casting rubber, let it cure, then peel away the Dixie Cup. You then split the casting rubber using a razor saw at the middle of the plug, open it up and you have a mold. Insert a throttle handle into the mold, fill it with colored acrylic, allow it to cure, then open the mold and remove the new handle. I could just make the handle from clear or tan acrylic and paint it, but an appropriately colored handle would look better. We'll see how that goes. rn | rn rn rn | | rn  | rn | rn | rn rn rn | | rn Close-Up of Throttle Console | rn | rn | rn rn rn | | rn | rn | rn | rn rn rn | Final confirmation of this machines serial number range has not been confirmed. The following service bulletin was issued by Wheel Horse in 1961, defining a way to determine if the machine is an early production or late production model. | rn rn rn
rn Wheel Horse Service Bulletin 1961 - 1990: #23 Issued: June 7, 1961
rn 5003 and 5010 Transmissions
rn
rn TO ALL DEALERS AND DISTRIBUTORS rn All tractors and replacement transmissions produced previous to tractor Serial No. 11628, contain Part No. 3521 Spline Shafts with 10 straight sided splines and matching gears, Part Nos. 3523, 3524, 3526.
rn
rn All tractors and replacement transmissions produced after serial number 11628, contain Part No. 3521 Spline Shafts with 11 involuted tooth splines and matching gears, Part Nos. 3523, 3524, 3526. The matching gears for the two types of Spline Shafts are NOT inter-changeable although part numbers are identical.
rn
rn It is suggested that, when ordering the #3523 High and Second Gear or #3526 Splined Pinion Gear, the number of Splines on the #3521 Spline Shaft be noted on your purchase orders. This will eliminate the possibility of receiving gears which will not assemble on the Spline Shaft.
rn
rn The ordering of the #3521 Spline Shaft should be handled in the same manner.
rn
rn Wheel Horse Products, Inc.
rn
rn Jack D. Walton, Part & Service Mgr.
rn
rn JDW:md rn
rn | rn rn rn | | rn | rn | rn | rn rn rn | rn When I disassemble the machine in Tennessee, I noted that the transmission looked to have never been removed from the front frame before then. Today I started work on the transmission and came across some great information about determining the age of the machine. The first peek inside this transmission revealed the transmission was found to have eleven (11) splines on part number 3521, not ten (10). This indicates the transmission is a post-#11628 serial number model. (See the above WH Service Bulletin). rn Another tell-tale sign is the presence of roller bearings on the Brake Shaft, mine has roller bearings. Per the 5003/5010 Transmission Service Manual, early 5003 transmissions had ball bearings on the Brake Shaft, later model transmissions had roller bearings on the Brake Shaft. Based on the serial number when the transmission changes were made, in light of ~20,000 made in 1958 and an additional ~2500 in 1959, that makes the change somewhere about mid year 1958 or a little later. I am unsure of the dates of these two transitions, but am pretty sure that these facts point towards a late 1958 or early 1959 model. rn | rn rn rn | | rn  | rn | rn | rn rn rn | | rn Completed Front Rims and Throttle Console | rn | rn | rn rn rn | | rn | rn | rn | rn rn rn | rn Update (July 7, 2009): Completed disassembly of the transmission. Unfortunately I did not get any pictures of the disassembly process, as it's a little hard to take pictures when you're up to your elbows in 50 year old smelly, crappy-assed, emulsified oil. rn Inspected the run-out on all bronze bearings and found all to be unacceptable. While inspecting all of the ball bearings I found one seized, and one partially seized, along with three very "crunchy" feeling ones. I do not trust any of the remaining bearings and therefore will perform a complete rebuild of the transmission, replacing all bearings (Roller, Ball and Bronze) just to be safe. I do not want to have to open this transmission once the restoration is completed, just for not replacing something which was going bad when I had it apart. Now in a temporary holding pattern on the transmission waiting for replacement parts to arrive. All parts should arrive no later than Tuesday, July 14, 2009. rn The image below is the internal parts next to the primed covers and case. Unfortunately I forgot to put the Brake Shaft & Gear in the picture. My intention in priming the case and covers first is to protect the surfaces during the rebuild, and once reassembly is completed, I can clean and degrease the exterior; lightly prime again; prepare the surfaces for paint; and shoot the red in one piece. This way the metal is protected during the rebuild, any surface defects can be repaired before the second coat of primary, and the red paint is completely pristine when completed. Also, painted the Lift Link Cable, as shown below. rn | rn rn rn | | rn  | rn | rn | rn rn rn | | rn Torn-Down Transmission and Completed Lift Cable | rn | rn | rn rn rn | | rn | rn | rn | rn rn rn | Update (July 8, 2009): Since the rebuild of the RJ-58 5003 Transmission is a process in itself I will dedicate a page solely to its refurbishment. Please see the following page for complete details: CLICK HERE | rn rn rn | | rn | rn | rn | rn rn rn | rn Update (July 9, 2009): Received the reproduction "Clevis Pin, Steering" parts from the machinist. When he arrived he informed me that he didn't have any standard bar stock large enough to make the parts so he used stainless steel, and then asked me if that was OK. Well, if I have to, sure! Yea right, they are beautiful. I'm thinking I'll just polish and wax them, and leave them as-is with no paint. rn Also located an original Kill Switch (ON-OFF) from a local collector of old electrical parts. The part found is an exact match for the Wheel Horse original part, right down to the short, ball-end lever, the brown Bakelite case, and the small screw-in terminals. You never know where your going to find the next needed part. All I need now is the ON-OFF placard and I'm set there. rn | rn rn rn | | rn rn rn | Update (July 15, 2009): Received both seal parts and found item ID 103, P/N 1257-Oil Seal, Axle 1" shaft x 1-3/8" ID on Cup, 2ea which fits over the end of the axle tube (replaced by TORO P/N 83-2840) and translates to SKF P/N CR9835 is incorrect. The part received has a rolled inside lip which does not fit over the tube as it should, and there is no sealing material on the inside either. Have decide to order the Toro Part from MowParts at this link. It just pays to spend a little more and get the OEM part. Ball and Bronze Bearings have not arrived. Found that it was easier to locate the 5/16" thick R12 open race bearings than it was to locate the 3/8" thick ones. Have procured 1/16" spacers for the three locations where the 3/8" bearings are installed, and use the 5/16 thick bearings. | rn rn rn
|
Last Updated: 2010-06-13 16:02:20 (8401 views)
|
|


 Previous